Setting up a communication resource for your contact center sounds straightforward, but the process can often feel like a maze of configurations. In this guide, I’ll walk you through the steps in the Azure portal, highlighting where things can get tricky and where to focus. Let’s break down the process step by step, so you can avoid the pitfalls.
While this Microsoft guide Create and manage resources in Azure Communication Services gives a good overview, it doesn’t cover the nuances of Azure Communication Services and how it integrates with Dynamics 365 Contact Center. In this post, I’ll cover all the steps you might not find in the official guide, with additional tips along the way.
Prerequisites
- Microsoft Azure Account:
- You need an active Azure subscription. If you don’t already have one, sign up for a free account or a paid subscription here.
- Access to the Azure Portal:
- Ensure you can log in to the Azure Portal with the Microsoft account associated with your Azure subscription.
- Basic Knowledge of Azure services:
- Familiarize yourself with Azure Communication Services and its capabilities (like video calling, voice, SMS, etc.), as well as how it integrates with other Azure services and third-party systems. Familiarity with the concept of event topics, including creating topics, subscribing to events, and using webhooks for event-driven architectures is also useful.
- Integration Concepts:
- General understanding of API integration, connection strings, and event-driven programming concepts will be helpful for troubleshooting and connecting Azure services to Dynamics 365.
- Security Best Practices:
- Knowledge of best practices for securing your Azure resources, such as managing connection strings, using Role-Based Access Control (RBAC) for permissions, and handling sensitive data securely.
Note: The following set up guide is based on features in the Azure portal. If you’ve started a trial for a phone channel in D365 Contact Center, you first need to end that trial in order to be able to configure a paid subscription.
Create an Azure subscription
The first step is to create an Azure account with an active subscription which is pretty straight forward. If you don’t have a Microsoft account, you’ll need to create one. This is the account you’ll use to manage your Azure subscription. There are different Azure subscriptions to apply for, e.g. the pay-as-you-go. Once your account is set up, you can access the Azure portal at Azure Portal. Log in using the Microsoft account you used to sign up. You can at any time find your subscription information by navigating to the Subscription section under the All services tab in the portal. You can now start creating and managing resources, such as virtual machines, databases, and storage solutions, from the Azure portal.
Create an Azure Resource Group
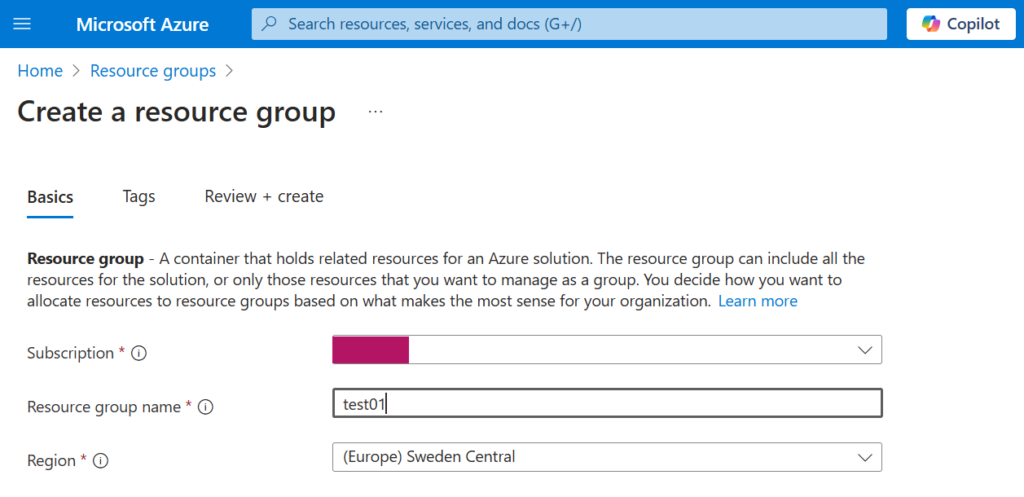
Next step is to create a resource group. In the upper-left corner of the page, select + Create a resource or use the search bar at the top of the portal.
For the new resource group you need to specify the subscription to which you want to tie the group (i.e. the one you set up in an earlier step), give the resource group a name and specify the Azure geo-region applicable. Keep in mind that different Azure services have regional availability, so the services you can use in a resource group will depend on the region where that resource group is located.
Create an Azure Communication Services resource
You can set up Communication Services either directly in the Azure portal or by using the .NET management SDK. Using the portal, click +Create resource, and search for communication. Create a Communication Services. This is the service that provides both IP communication capabilities like video and voice calling and chat, as well as PSTN capabilities like calling, SMS messaging, and phone number provisioning to utilize that.
Select the Subscription and resource group you to which you want to connect the ACS. Give it a name and list the data location region. Click Review + Create.
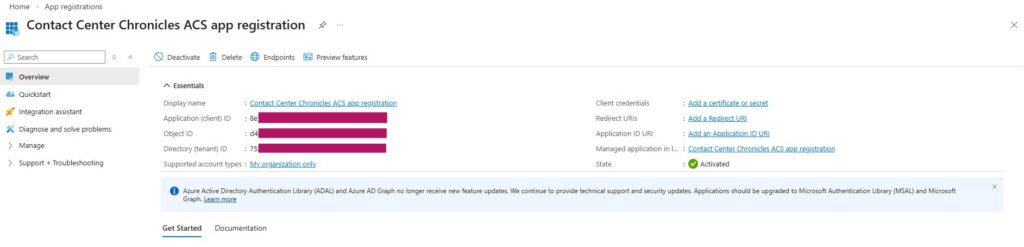
Create an app registration
You will need to create an App Registration within Azure Active Directory for the Communication Services to connect to Dynamics 365.
Note! App registrations can only be created by a Global Admin. Global Admin is required to ensure that only trusted applications have access to sensitive resources. This registration is essential in order to continue with the ACS registration in D365 Contact Center.
Go to App Registration – Register an application. Choose the supported account types (Azure AD + type of tenant, e.g. single or multi). Once the registration is done, make a note of the app ID and tenant ID.
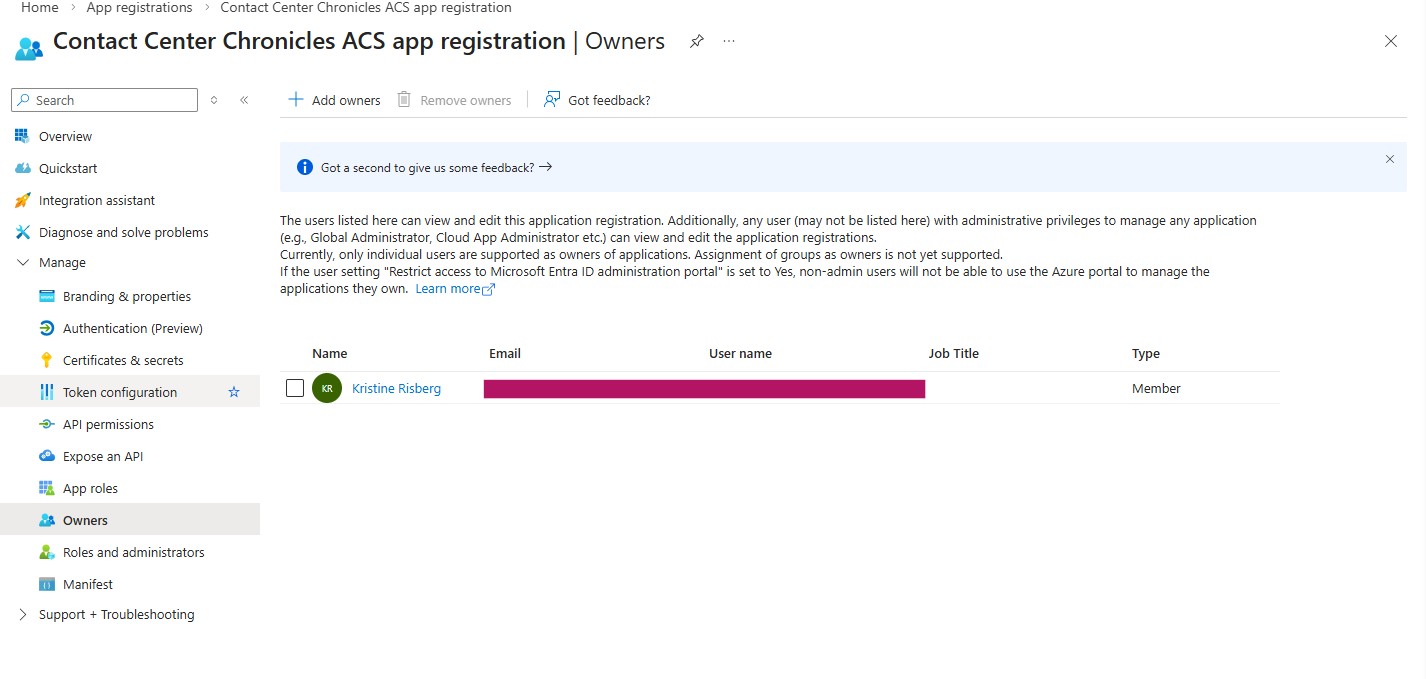
You must ensure that the user configuring the event subscription is assigned as an Owner of the associated App Registration in Microsoft Entra ID. This requirement applies when using AAD-secured webhooks, as Azure Event Grid performs an access check during subscription creation. Specifically, the subscribing user must either be an Owner of the App Registration, or assigned the AzureEventGridSecureWebhookSubscriber role on the application.
This is necessary because the App Registration is used to secure the webhook endpoint, and Azure enforces that only authorized users can create subscriptions targeting AAD-protected endpoints.
Locate connection strings and service endpoints
Next up, we’re gonna locate the connection strings that enable the Communication Services SDKs to connect and authenticate to Azure. You can access your Communication Services connection strings and service endpoints from the Azure portal, but also programmatically with Azure Resource Manager APIs.
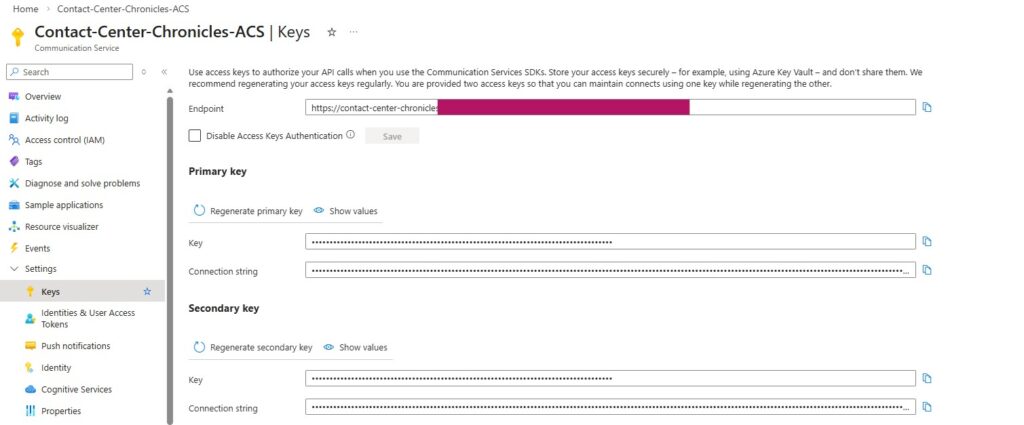
In the Azure portal; select Keys from the navigation menu and copy the Connection string or Endpoint values for usage by the Communication Services SDKs. You have access to primary and secondary keys. Primary keys will be used for access from Omnichannel for Customer Service. Hold on to the values you’ve copied.
Create access tokens for temporary access and testing
Navigate to the Identities & User Access Tokens blade within the Settings of your Communication Services resource. Choose the scope of the access tokens. Click Generate.
You’ll see an identity and corresponding user access token generated. You can copy these strings and use them in the sample apps and other testing scenarios.
Acquire a phone number 📲
Navigate to the Phone Numbers blade in the communication resource menu. Press the Get button to launch the wizard. The wizard on the Phone numbers blade will walk you through a series of questions that helps you choose the phone number that best fits your scenario.
Start by selecting the country or region where you want to provision the phone number. After selecting the Country/region, you will then need to select the Use case which best suites your needs. Select your phone number features and click the Next: Numbers button at the bottom of the page to customize the phone number(s) you would like to provision. The summary page will review the Number type, Features, Phone Numbers, and Total monthly cost to provision the phone numbers.
Purchased numbers are available from the Phone numbers section of the resource.
Configure an Azure Event Grid
But first: what is an Event Grid and why is it Used Here?
Azure Event Grid is a fully managed event routing service that allows you to easily send events from one service to another. Think of it as a real-time event delivery system that ensures your applications respond to events as soon as they happen. It acts like a “messenger” for your data: when something changes (for example, a call recording gets updated), Event Grid helps other applications or services know about it immediately.
In the context of Azure Communication Services (ACS), Event Grid is used to manage and send notifications about specific events related to communication activities (like voice calls or SMS). This is critical for integrating communication services with other systems, like Dynamics 365 Contact Center, allowing real-time reactions or trigger of workflows based on those events.
For example, you might want to trigger a notification when a call recording is available or when a customer sends an SMS. With Event Grid, you can easily subscribe to these types of events and automatically process or respond to them. If you lack an Event Grid or if it’s not configured for incoming calls or call recording, no calls or recordings will work inside your workstreams. You will be prompted with an error message in the phone number configuration, as well as via a notification banner in the Copilot Service Admin Center.
Unless you’ve used Event Grid before, you’ll need to register the Event Grid resource provider. In the Azure portal, do the following steps:
- On the left menu, select Subscriptions.
- Select the subscription you want to use for Event Grid from the subscription list (the one that is tied to your ACS).
- On the Subscription page, select Resource providers under Settings on the left menu.
- Select Microsoft.EventGrid in the provider list.
- Select Register on the command bar.
Create an Event Grid system topic
An Event Grid topic provides a user-defined endpoint that you post your events to. We want to register an Azure Event Grid System Topic so that our app can listen to Azure Communication Service Events. The System Topic is pre-configured by Azure to handle events coming from specific services, like ACS, and is used to receive those events for further action or monitoring.
In the search bar at the top of the Azure Portal, type Event Grid System Topics, and then select Event Grid System Topics from the drop-down list.
Click Create Event Grid System topics and select Azure Communication Services as the Topic Type. For Resource select the ACS resource you created earlier.
Review the settings before clicking Create.
Create an event subscription
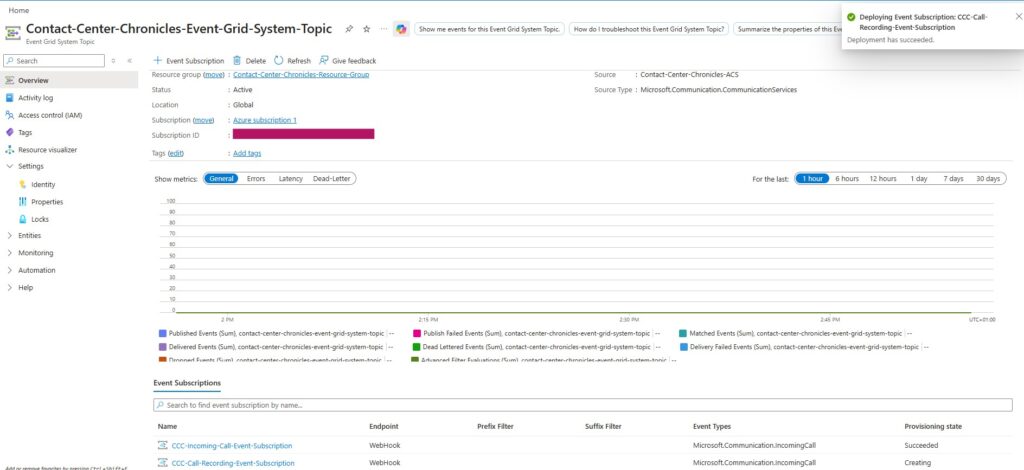
Next up, you need to create a subscription for specific events like incoming calls, incoming SMS/advanced messages, call recording, etc. Navigate to the Event Grid System Topic created and click + Event Subscription.
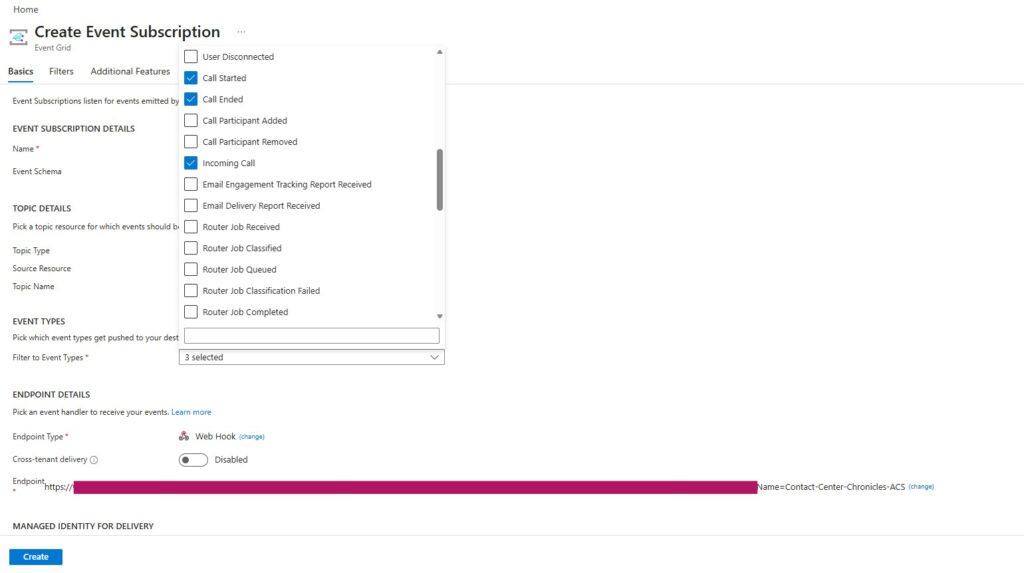
Name your subscription so that it matches the Event Grid System Topic name (that way you’ll know which subscription belongs to which topic). Specify the event types you want to subscribe to, by setting the Filter to Event Types to e.g. Incoming Call or Incoming SMS. Endpoint type should be set to Webhook.
There are multiple events pertaining to voice and messaging, that need to be tied to each of the three endpoint types available in Contact Center. You can only set one webhook endpoint at a time, so if you need to subscribe to several types of events, you’ll need to create one subscription for each with a defined subscription type and then repeat the procedure for the next packages of service.
I’ve created my subscriptions as per the following:
For the Incoming Call Webhook Endpoint (bottom of above picture), I created an Event Subscription called CCC-Incoming-Call-Event-Subscription to which I added the event types; Incoming Call, Call Started and Call Ended.
Navigate to the Additional Features tab. Check the box ”Use Microsoft Entra Authentication” in the MICROSOFT ENTRA AUTHENTICATION section and specify your Microsoft Entra Tenant ID and Entra Application ID or URI. The latter is the same as the Event Grid App ID.
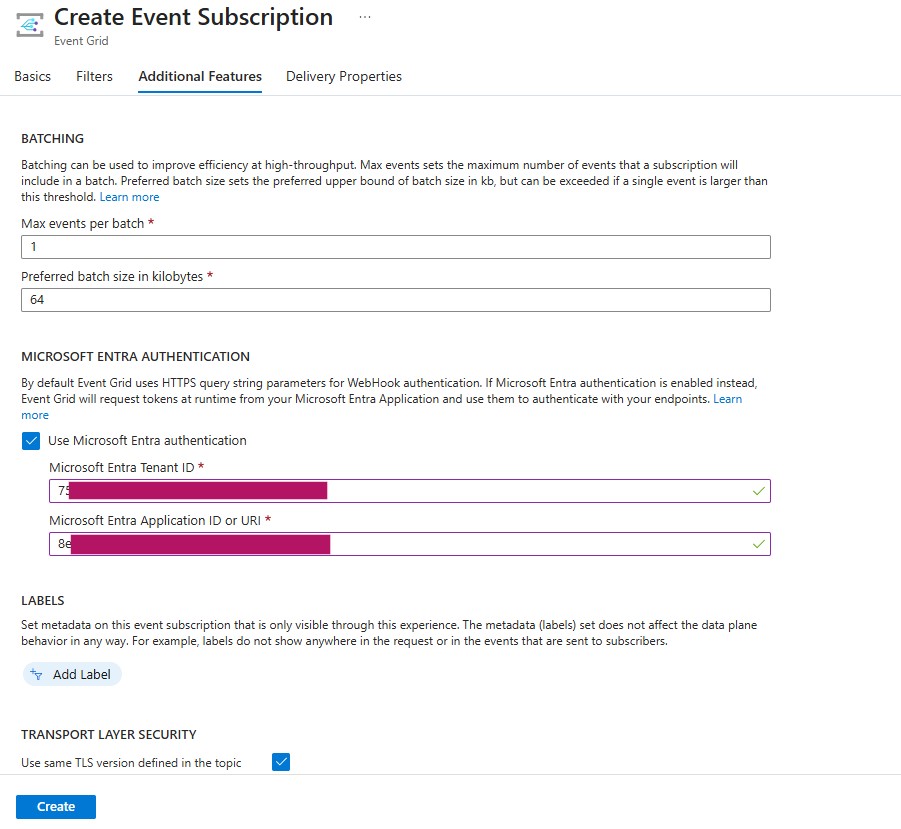
When configuring Entra authentication on the Event subscription using the App ID, we’re telling the Event Grid to use the App Registration (service principal) to authenticate when calling the webhook.
When these two IDs are added, click Create. When your subscription has finished you will be prompted with a confirmation message.
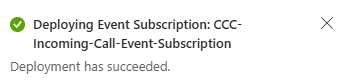
All registered subscriptions are available at the bottom of the home page of your Event Grid System Topic.
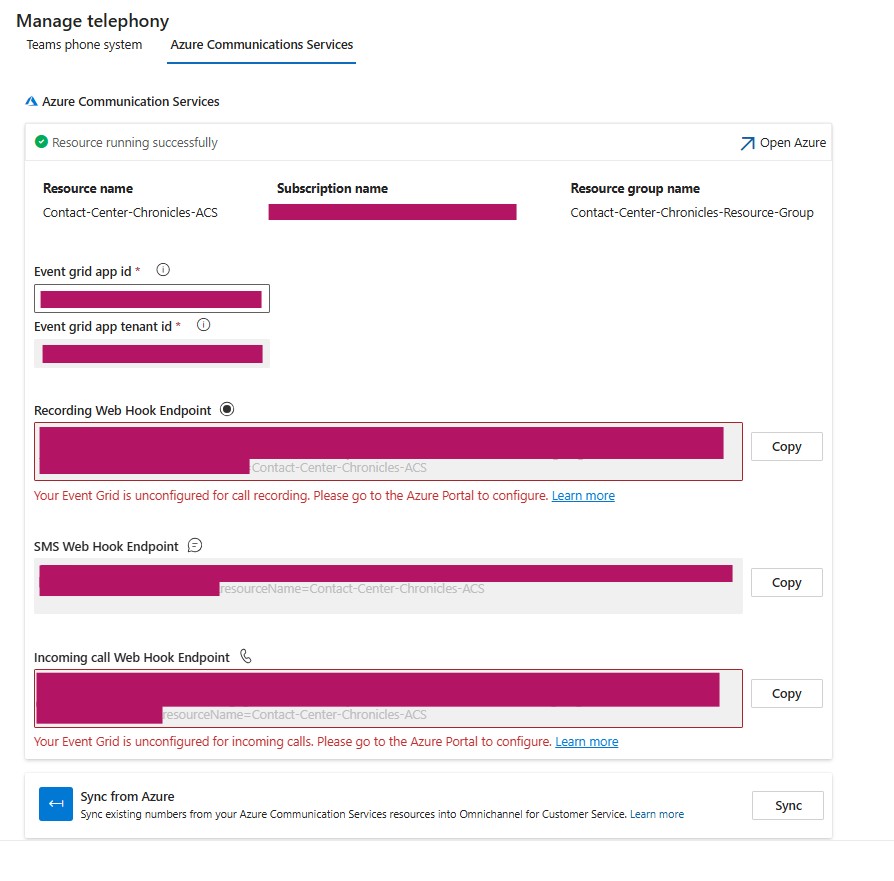
Connect D365 Contact Center to the Azure Communication Services Resource
To connect an existing Azure resource to Azure Communication Services, go to Copilot Service Admin Center –> Channels –> Phone Numbers. Click on Get started to connect to an existing Azure Communication Services to manage phone numbers for voice and SMS. (If you’re on an existing trial, this option won’t be available to you. End the trial and release the trial phone number in order to be able to sync to your own ACS.) Choose Use existing resource and enter the names, ID and connection string(s) as following:
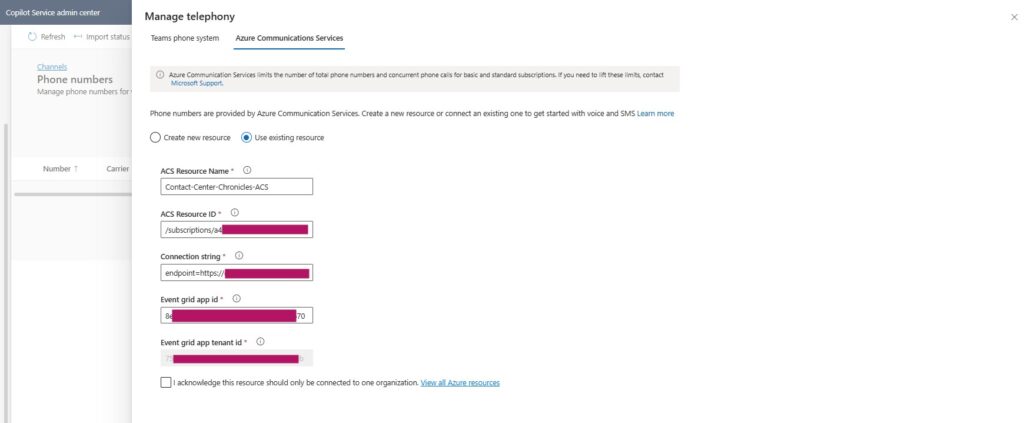
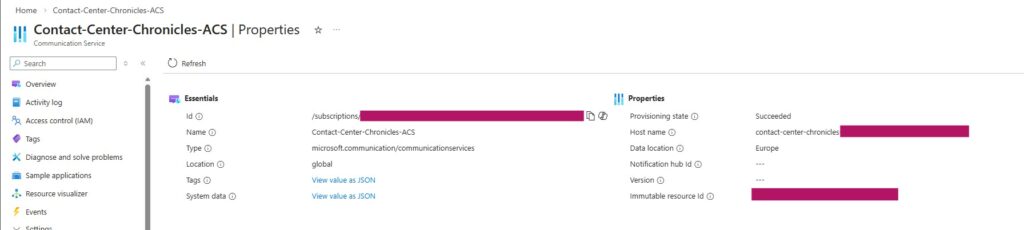
The ACS Resource name is the written name of your ACS resource. The ACS Resource ID, you’ll find in the Properties section of the Communication Service in the Azure Portal.
The connection string is the connection string taken from the primary key of the ACS, which you will find in the Keys section of the Communication Service in the Azure Portal.
The event grid app ID is the Application (client) ID from the application registration page in the Azure portal.
The Event grid app tenant ID will be automatically populated when you specify the app ID.
Acknowledge that the resource should only be connected to one organization, and then click Connect.

You will receive a notification when the configurations and verified and the connection is established. 🎉
To sync numbers already purchased in Azure, open Manage Telephony and navigate to the Azure Communication Services tab. Click Sync.

Lämna ett svar