Quality Evaluation Agent is one of the AI capabilities in Dynamics 365 Contact Center that helps evaluate customer interactions based on defined quality criteria. Before you start working with evaluation criteria and plans, the agent itself needs to be enabled and configured with the correct connections, flows, data sources and publishing status.
This post covers the initial setup: how to enable the agent, configure the data it should use, and a few important things to be aware of before publishing.
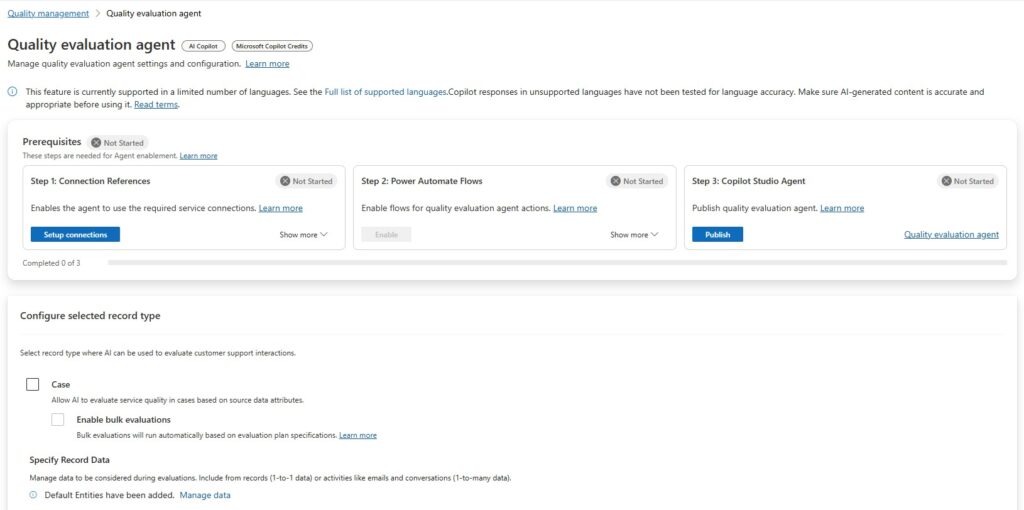
1. Open Quality Evaluation Agent configuration
In Copilot Service admin center, go to Quality management → Quality evaluation agent.
The configuration page shows the prerequisites required to enable the agent. These are grouped into three steps:
- Connection References
- Power Automate Flows
- Copilot Studio Agent
All three need to be completed before the agent is fully ready.
2. Set up connection references
Start with Step 1: Connection References.
This enables the agent to use the required service connections. In my setup, the connection references included:
- Microsoft Dataverse connection reference for QEA
- Microsoft Copilot Studio connection reference for QEA
After the connections are configured correctly, the step should show as Ready.
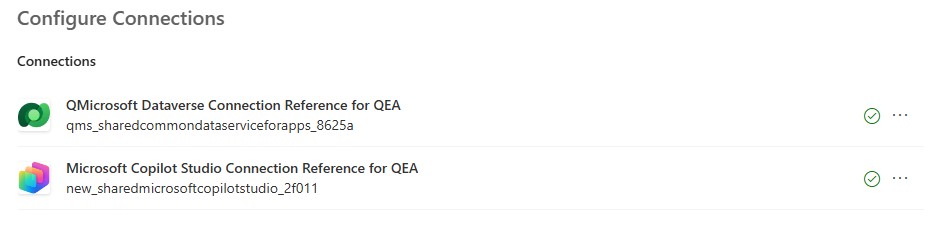
This is an important part of the setup because the agent and its flows need access to the relevant Dataverse and Copilot Studio resources in order to retrieve input data and perform evaluations. If you have trouble creating the connections from CSAC, you can configure them manually in the maker portal by going to Solutions → Default Solution → Objects → Connection References.
3. Enable the Power Automate flows
Next, enable the Power Automate flows used by the Quality Evaluation Agent.
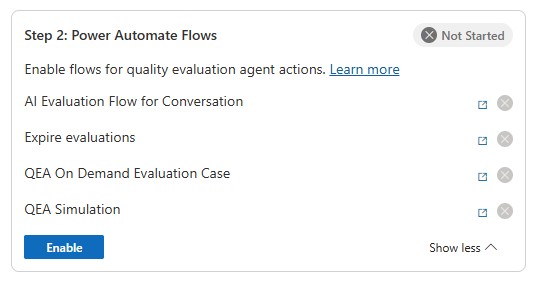
The flows I saw enabled as part of the setup were:
- AI Evaluation Flow for Conversation
- Expire evaluations
- QEA On Demand Evaluation Case
- QEA Simulation
Once enabled, the Power Automate flows should show as Ready.

One important ALM observation: the flows were added to the Default Solution, not to my preferred custom solution.

The agent itself is hosted in a Microsoft-managed solution called Quality management solution intelligence.
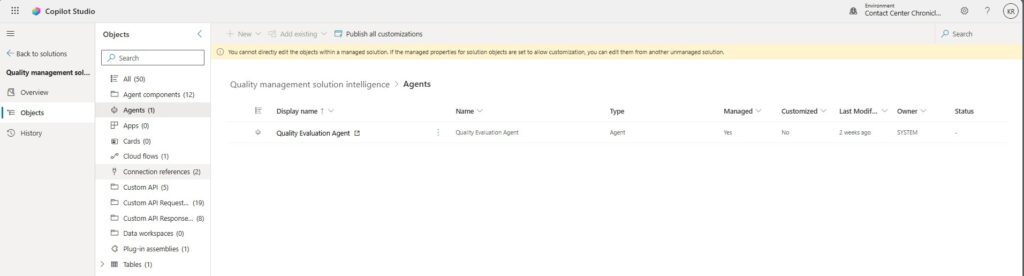
That means you should be aware of where the components are created and managed. If you work with controlled ALM and solution-based deployment, this is worth documenting clearly. Not every component in this setup will necessarily land where you would normally expect your project-specific components to be stored.
4. Publish the Copilot Studio agent
The third prerequisite is to publish the Copilot Studio agent.
In Copilot Service admin center, this appears as Step 3: Copilot Studio Agent. You can publish the Quality Evaluation Agent directly from the setup page.

If publishing from Copilot Service admin center fails, use the link on the agent name to open the agent in Copilot Studio. From there, publish the agent manually and then return to Copilot Service admin center to refresh the status.

When publishing in Copilot Studio, you may see a warning that the agent runs tools using the author’s credentials. This should be reviewed before publishing, especially in environments where ownership, credentials, and operational responsibility are tightly governed.
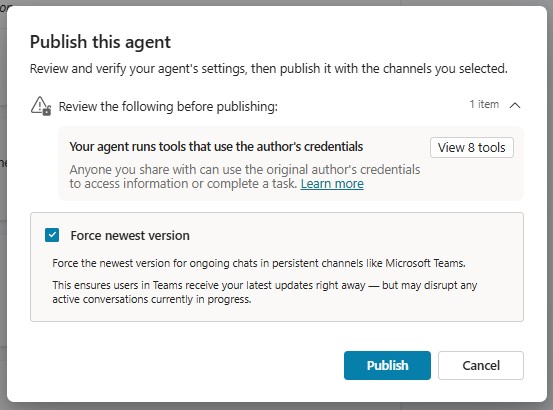
After publishing, the agent status should move to Ready.
5. Configure evaluation criteria scoring
Before configuring the data and evaluation plans, review the scoring setup carefully.
The setting Enable scoring for criteria allows you to define scoring logic within evaluation criteria. Each criterion can then be evaluated on a numeric scale, such as 0 to 100, with a threshold value used to determine whether performance expectations are met.
This setting needs to be thought through thoroughly before it is enabled. It is a one-time configuration and cannot be reversed later.

In my setup, the threshold value was set to 85 out of 100, but the correct value depends on the organization’s quality model, reporting expectations and calibration process.
Before enabling scoring, consider:
- Whether all evaluations should be scored numerically
- What threshold represents acceptable quality
- Whether criteria should be equally weighted or weighted differently
- How supervisors will interpret and act on the scores
- Whether the score will be used for coaching, compliance, reporting or operational follow-up
This is not just a technical setting. It affects how quality performance will be measured and communicated.
6. Select the record types to evaluate
The Quality Evaluation Agent can be configured to evaluate different types of customer support interactions.
In the setup screen, I could select:
- Case
- Conversation
Each record type can have its own data configuration.
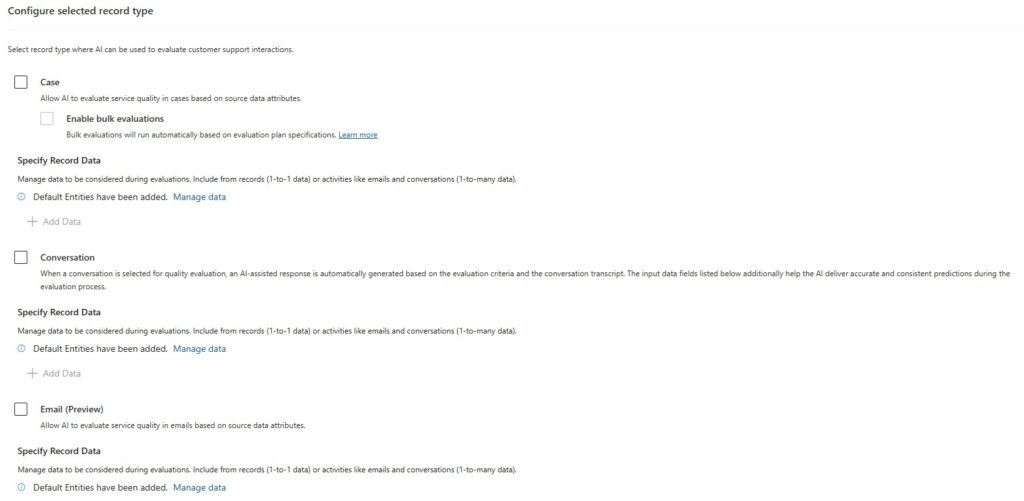
Case
For cases, the agent can evaluate service quality based on case attributes and related data. In my setup, bulk evaluations could also be enabled for cases, allowing evaluations to run automatically based on evaluation plan specifications.
The default data fields included examples such as:
- Case title
- Description
- Priority
- Severity
- Created on
- Related conversations
- Case notes
- Related emails
- Case resolution data
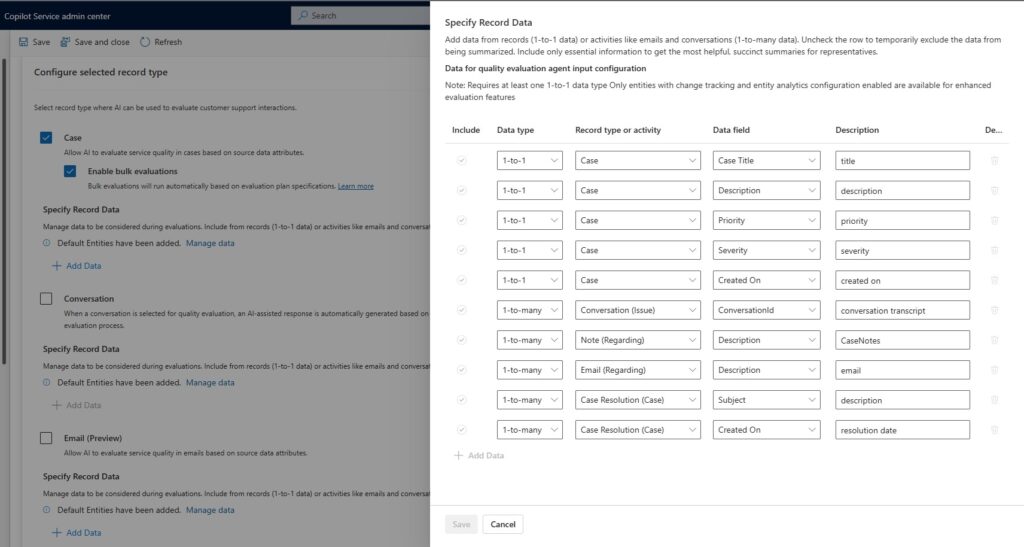
This allows the evaluation to include both structured case metadata and related interaction history.
Conversation
For conversations, the agent can evaluate the customer interaction using the conversation transcript and related conversation attributes.
The default conversation data included:
- Chat transcript
- Conversation first response time
- Intent of conversation
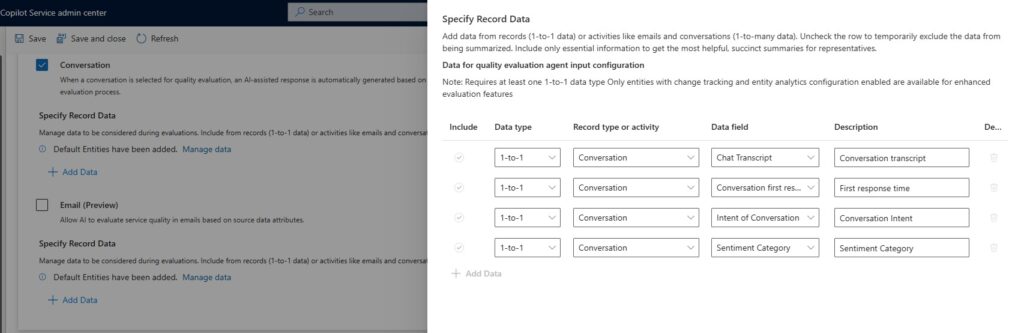
I added Sentiment Category as part of the conversation data. This is useful because sentiment can provide additional context when evaluating the quality of the interaction, especially when the evaluation criteria include tone, empathy, escalation handling or customer experience.
Email is currently marked as preview in the setup experience.
I configured email separately by mapping:
- Description
- Subject
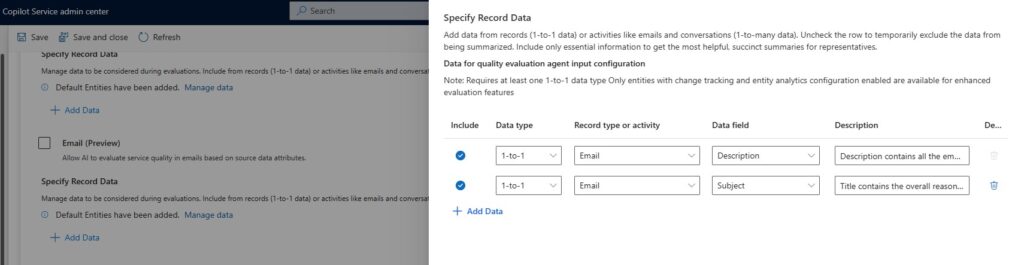
This is useful because emails may need to be evaluated separately from cases. Not every incoming email necessarily has a corresponding case created, and in some scenarios you may want to evaluate the email exchange on its own.
Keeping email evaluation separate can also help when you want to evaluate the conversational context between the customer and the CSR without mixing in case-related attributes such as priority, severity or case resolution.
7. Configure record data carefully
For each selected record type, you can manage the data that should be considered during evaluations.
The setup allows you to add data from:
- Records, using 1-to-1 data
- Related activities or records, using 1-to-many data
The configuration screen also notes that at least one 1-to-1 data type is required, and that only entities with change tracking and entity analytics configuration enabled are available for enhanced evaluation features.
This step is important because the quality of the evaluation depends heavily on the data you provide to the agent.
Include enough information for the evaluation to be meaningful, but avoid adding unnecessary data that may make the evaluation less focused. The goal should be to give the agent the most relevant context for the type of interaction being evaluated.
For example:
- For conversations; the transcript is central.
- For cases; case title, description, notes and resolution information may be relevant.
- For emails, subject and description may be enough if the evaluation should focus on the email exchange itself.
8. Save and validate the setup
After configuring the prerequisites, record types, scoring and data mappings, save the configuration and verify that the setup page shows all prerequisite steps as Ready.
At this point, the agent is enabled and ready to be used as part of the quality evaluation process.
Before moving into production use, I recommend validating the setup with a small number of test records first. This helps confirm that:
- The selected data fields provide enough context
- The evaluation output is relevant
- The scoring model behaves as expected
- The agent can access the required data
- The Power Automate flows are enabled and running
- The Copilot Studio agent has been published successfully

Key setup considerations
There are a few things I would specifically pay attention to when enabling Quality Evaluation Agent.
First, think carefully before enabling criteria scoring. This is a permanent setting and should align with the organization’s quality framework.
Second, review which data fields are included for each record type. The agent’s evaluation is only as good as the context it receives.
Third, be aware of solution placement. The flows may be added to the Default Solution, while the agent itself is part of a Microsoft-managed solution. This matters if you work with ALM, managed solutions and deployment pipelines.
Prerequisites before enabling Quality Evaluation Agent
Before enabling Quality Evaluation Agent, there are a few prerequisites to verify.
First, make sure the required security roles are assigned:
- Quality Administrator is required to configure the Quality Evaluation Agent.
- Quality Manager is typically assigned to supervisor personas and is used to create evaluation criteria and evaluation plans.
- Quality Evaluator is also typically assigned to supervisor personas and is used to complete or assign evaluations.
You also need to have Microsoft Copilot credits available. Both prepaid capacity and pay-as-you-go billing models are supported, but consumption should be reviewed as part of the implementation planning.
In Power Platform admin center, the setting Enable AI agents for your Dynamics 365 environment must be turned on for the environment.
You also need to provide consent for potential data movement across regions. This is required because Copilot and generative AI service calls may be routed outside the customer’s regional boundary if local capacity is temporarily unavailable.
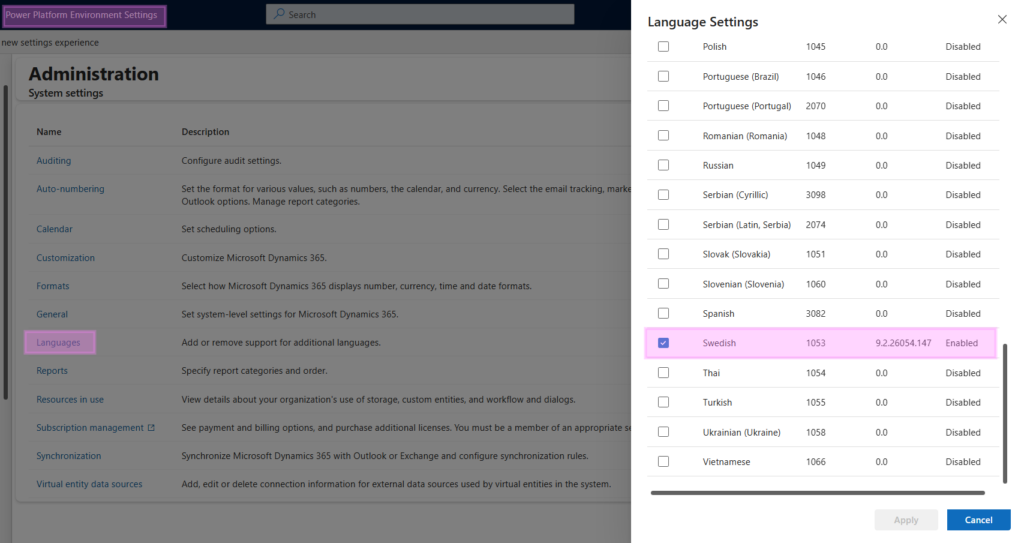
Thirdly, any language you want to run the evaluation in (questions and output) needs to be enabled as a system language through the Power Platform Environment Settings.
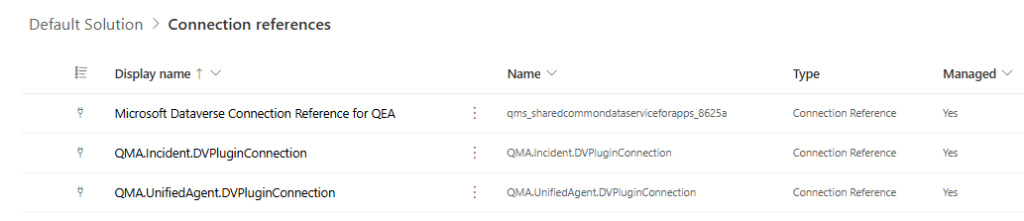
Finally, connection references must be configured for the Quality Evaluation Agent flows. These connections allow the flows to integrate with Microsoft services and link the agent to required data sources such as Microsoft Dataverse and Copilot Studio.
The required connection references include:
- Microsoft Dataverse Connection Reference for QEA
- Microsoft Copilot Studio Connection Reference for QEA
- QMA.Incident.DVPluginConnection, applicable to evaluations on cases and emails
- QMA.UnifiedAgent.DVPluginConnection
If you have trouble creating the connections from Copilot Service admin center, you can configure them manually in the maker portal by going to Solutions → Default Solution → Objects → Connection References.

The upcoming post will detail how to use the Quality Evaluation Agent on demand and through evaluation plans!
Lämna ett svar